FAQ Q323: How can I use Planyo to limit the number of customers who can visit my establishment simultaneously?
Absatz: Determining availability and booking constraints
Planyo can be very easily configured for this use case. It's enough to create a single resource with the quantity set to the max. number of customers who can arrive simultaneously. There are 2 ways in which you can configure Planyo:
A. create time slots (e.g. of 1h duration) -- this method allows you strict control over the visits. At each full hour (or every 2 hours or so) you can ask all the visitors to leave so the next ones can arrive. This way you can be absolutely sure that no-one stays longer and therefore no more than X people are present. This model is useful if you have a very large number of visitors and it's impossible to control each visitor individually.
B. allow entry at any time but still the system makes sure no more than X persons are present at the same time -- the duration of the visit can be also fixed (e.g. 1h duration with possibility to arrive every 15min) or the duration can be chosen by the customer based on their need. This model is more useful if the max. number of visitors is small and if you can control each visitor individually.
Here are step-by-step instructions for the configuration.
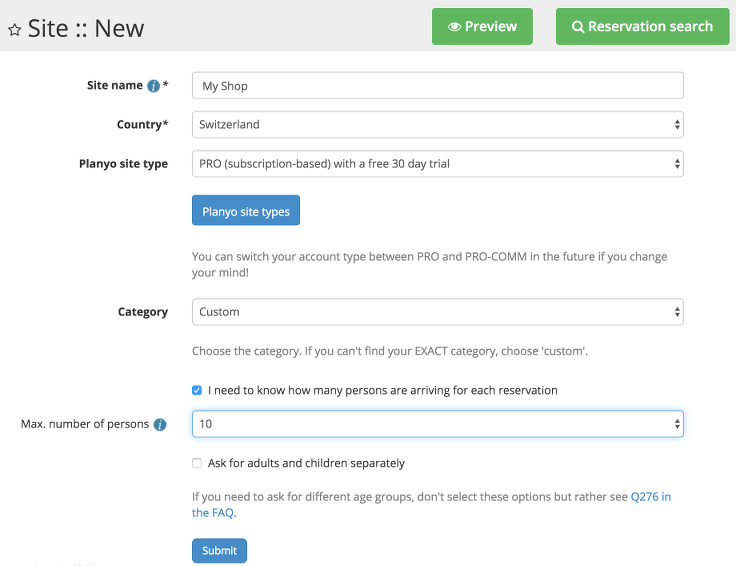
1. When creating a new Planyo site choose the Custom category. If you want to allow more than a single person per reservation, select I need to know how many persons are arriving for each reservation and then select the max. persons per arriving party.
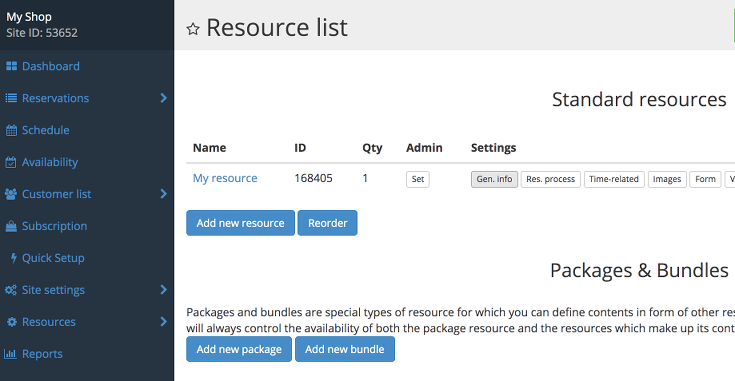
2. Click on Resources in the blue menu on the left and then click on General info next to your resource.
3. Choose your resource name, e.g. Shop visit, in Resource sharing choose Always possible and in Number of clients this resource can be shared between choose the max number of visitors. Submit the form at the bottom to confirm your settings.

4. Now configure the time-related settings. Go back to the Resources in the blue menu on the left, then click the Time-related button.
4A. Now if you want to proceed with the configuration option A (fixed time slots), set up your resource as follows:
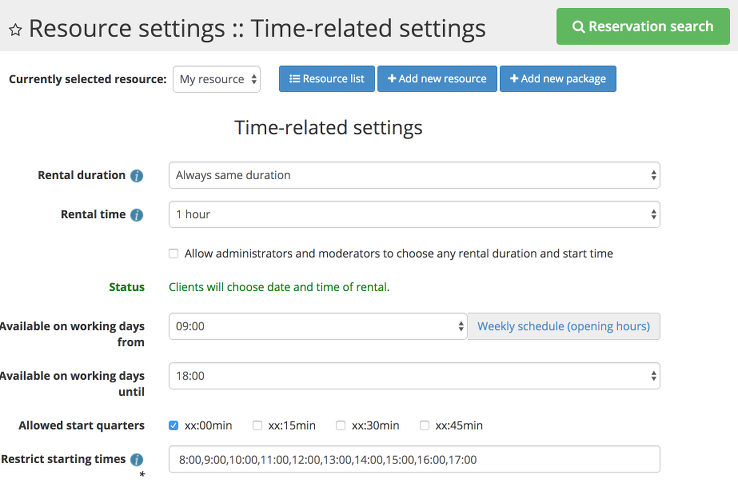
Set Rental duration to Always same duration, set the rental time to the desired duration (e.g. 1h) and then in the option Restrict starting times you need to enter all possible comma-separated arrival time slots. E.g. 10:00, 10:30, 11:00 or 10am, 10:30am, 11am would be a correct value.
4B. If you want to proceed with the configuration option B (arrival at any time), set up your resource as follows:
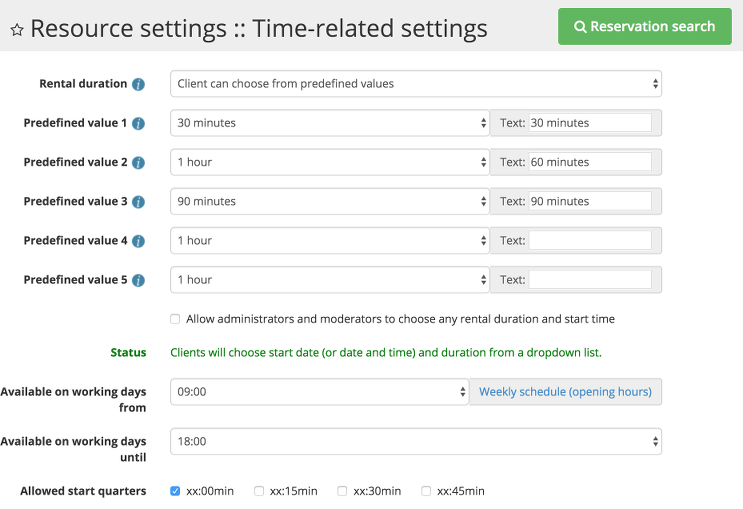
In Rental duration set Client can choose from predefined values, then list all the possible durations by choosing the duration from the dropdown as well as the text label for given duration. Only values with a label will be used.
Then in Allowed start quarters choose when the visitors can arrive, e.g. every 15 min (select all checkboxes) or every 30 min or only at full hour. You'll also need to choose the opening and closing time (Available on working days from ... until ...)
5. This is all you need to configure. Click on Integrate with my website in the menu on the left in order to get the HTML code of a widget to put on your website (more about this in Q116). See this tutorial for details of configuring email or sms messages sent to your customers.
If you'd like to use waiting lists for your limited resources, see Q326.
Note: there's another FAQ question which explains how to limit arrivals / check-ins (and not overall visitors present) per time unit.
A. create time slots (e.g. of 1h duration) -- this method allows you strict control over the visits. At each full hour (or every 2 hours or so) you can ask all the visitors to leave so the next ones can arrive. This way you can be absolutely sure that no-one stays longer and therefore no more than X people are present. This model is useful if you have a very large number of visitors and it's impossible to control each visitor individually.
B. allow entry at any time but still the system makes sure no more than X persons are present at the same time -- the duration of the visit can be also fixed (e.g. 1h duration with possibility to arrive every 15min) or the duration can be chosen by the customer based on their need. This model is more useful if the max. number of visitors is small and if you can control each visitor individually.
Here are step-by-step instructions for the configuration.
1. When creating a new Planyo site choose the Custom category. If you want to allow more than a single person per reservation, select I need to know how many persons are arriving for each reservation and then select the max. persons per arriving party.
2. Click on Resources in the blue menu on the left and then click on General info next to your resource.
3. Choose your resource name, e.g. Shop visit, in Resource sharing choose Always possible and in Number of clients this resource can be shared between choose the max number of visitors. Submit the form at the bottom to confirm your settings.
4. Now configure the time-related settings. Go back to the Resources in the blue menu on the left, then click the Time-related button.
4A. Now if you want to proceed with the configuration option A (fixed time slots), set up your resource as follows:
Set Rental duration to Always same duration, set the rental time to the desired duration (e.g. 1h) and then in the option Restrict starting times you need to enter all possible comma-separated arrival time slots. E.g. 10:00, 10:30, 11:00 or 10am, 10:30am, 11am would be a correct value.
4B. If you want to proceed with the configuration option B (arrival at any time), set up your resource as follows:
In Rental duration set Client can choose from predefined values, then list all the possible durations by choosing the duration from the dropdown as well as the text label for given duration. Only values with a label will be used.
Then in Allowed start quarters choose when the visitors can arrive, e.g. every 15 min (select all checkboxes) or every 30 min or only at full hour. You'll also need to choose the opening and closing time (Available on working days from ... until ...)
5. This is all you need to configure. Click on Integrate with my website in the menu on the left in order to get the HTML code of a widget to put on your website (more about this in Q116). See this tutorial for details of configuring email or sms messages sent to your customers.
If you'd like to use waiting lists for your limited resources, see Q326.
Note: there's another FAQ question which explains how to limit arrivals / check-ins (and not overall visitors present) per time unit.